
How to
Installing AD v3 on a Cabinet
You install AD v3 on a control cabinet to use AD v3 for locally accessing the automation servers.
AD v3 is installed on a control cabinet using a 22 mm (0.87 inch) cable fitting (gland) and a nut. AD v3 is delivered with the cable fitting integrated on the back cover. The position of AD v3 on the cabinet is fixed by the earth ground screw and the nut fastens the device to the cabinet.
AD v3 comes with a rubber gasket for IP 54 preinstalled on the back cover. The rubber gasket is used to help prevent against dust and moisture from entering the control cabinet through the 22 mm (0.87 inch) hole. The rubber gasket also helps prevent the device from rotating when the nut is screwed onto the cable fitting.

AD v3 with cable fitting, rubber gasket, earth ground screw hole, and nut
AD v3 is delivered with a template to facilitate making a 22 mm (0.87 inch) hole and a 4.5 mm (0.18 inch) hole for the earth ground screw on the cabinet.
When you have installed AD v3 on the control cabinet and fastened the device to the cabinet using the nut, you adjust the position of the device and use the earth ground screw to fix the position. You then connect the earth ground wire to the screw. Finally, you connect the AD v3 cable to the female USB-C connector on the cable fitting. The cable's angled connector helps prevent downward stress of the cable.

AD v3 cable and earth ground wire connected to AD v3
Use adhesive tape to attach the template onto the cabinet.
action_zoom_plus_stroke 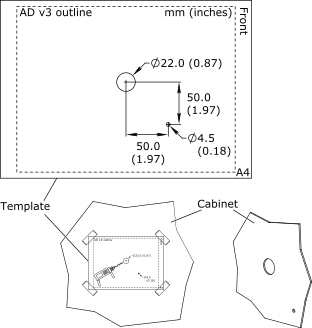
Mark the place where the center hole for the cable fitting and the hole for earth ground screw should be on the cabinet.
Make a 22 mm (0.87 inch) diameter center hole in the cabinet.
You can use a metal hole punch to make the hole in the cabinet.
Make a 4.5 mm (0.18 inch) diameter hole for the earth ground screw in the cabinet.
Put the device on the cabinet with the cable fitting inserted through the center hole in the cabinet.
Thread the nut onto the cable fitting and then loosely tighten the nut.
action_zoom_plus_stroke 
Adjust the position of the device so that the hole for the earth ground screw on the device aligns with the corresponding hole in the cabinet.
Fit the earth ground wire and the earth ground screw (M4 x 10 mm Phillips pan head machine screw with external tooth washer) to the hole in the cabinet, tighten the screw so that the wire cannot be pulled loose, and then tighten the nut.
action_zoom_plus_stroke 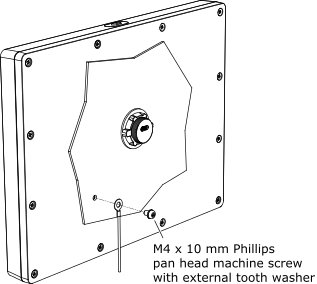
Plug the AD v3 cable's angled male USB-C connector into the USB-C female connector on the cable fitting.
action_zoom_plus_stroke 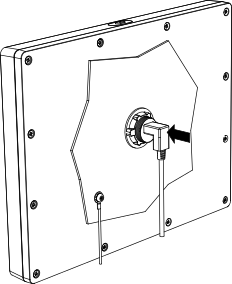
You can now make the required connections for power supply and communication with the automation servers.
 AD v3 Installation
Connecting AD v3 to an Automation Server and a 24 VDC Power Supply
AD v3 Installation
Connecting AD v3 to an Automation Server and a 24 VDC Power Supply