
How to
Installing a Remote Control on a Wall
You install a remote control (RP-C-RC-BLE) on a wall using the base delivered with the device.
The remote control (RP-C-RC-BLE) is delivered with a base that allows the remote control to be installed on a wall or partition.
The remote control must be professionally installed and serviced to comply with the following rules and regulations:
Part 15 of the Federal Communications Commission (FCC) rules
Innovation, Science and Economic Development Canada (ISED) licence-exempt Radio Standards Specifications (RSSs)
2014/53/EU Radio Equipment Directive (RED) of the European Union (EU)
S.I. 2017/1206 - Radio Equipment Regulations 2017 of the United Kingdom (UK)
For more information, see Remote Control Regulatory Compliance and Approvals .
The base supports the following alternative installation methods:
Installation on a wall using adhesive tape
Installation on a wall using two self-tapping screws with flat countersunk screw heads
For example, you can use two Philips 4.2 mm (0.165 in.) diameter self-tapping screws with flat countersunk screw head of diameter 8.1 mm (0.319 in.).
The remote control can be fixed in the base. For example, you can use a Philips 2.2 mm (0.087 in.) diameter self-tapping machine screw with a 4.3 mm (0.169 in.) diameter flat countersunk screw head and a maximum length of 13 mm (0.512 in.).

Remote control with base installed on a wall
Refer to the dimensional drawing before installing the remote control.
action_zoom_plus_stroke 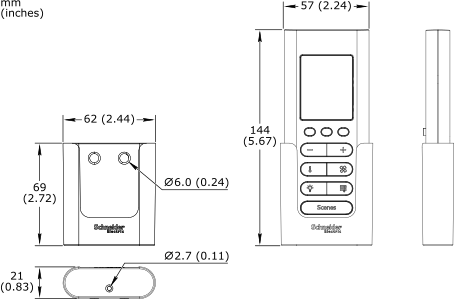
Ensure that you have the proper mounting hardware.
Find a suitable location on the wall for mounting the remote control.
Hold the base against the wall and mark the place where the two drill holes should be on the wall.
Tip:You can also install the remote control on a wall using adhesive tape.
action_zoom_plus_stroke 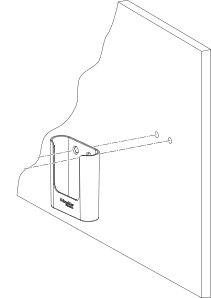
Fasten the base on the wall using two self-tapping screws with flat countersunk screw heads and wall anchors (optional).
Tip:Use two Philips 4.2 mm (0.165 in.) diameter self-tapping screws with flat countersunk screw heads of diameter 8.1 mm (0.319 in.).
action_zoom_plus_stroke 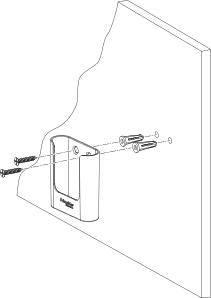
Mount the remote control into the base.
action_zoom_plus_stroke 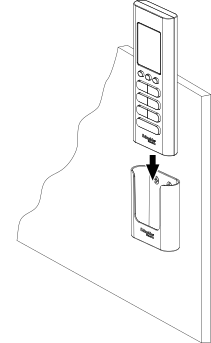
Fasten the remote control to the base using a self-tapping screw with a flat countersunk screw head and a maximum length 13 mm (0.512 in.).
Tip:Use a Philips 2.2 mm (0.087 in.) diameter self-tapping machine screw with a 4.3 mm (0.169 in.) diameter flat countersunk screw head.
action_zoom_plus_stroke 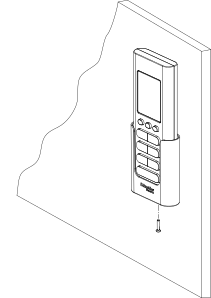
You can now use the remote control.
 RP Controller Expansion Remote Control Device Installation