earth_america
user_standard Log on
action_search_stroke
earth_america
Log on to rate and give feedback 1 2 3 4 5 Log on to rate
0
How to

How to


Products: CRS-HH-REL-10, RP-C
Functionalities: Hardware
Product version: 3.3, 2022
7/22/2021

Wiring a Screw Terminal on CRS-HH-REL-10

You wire the screw terminals on the CRS-HH-REL-10 relay module to connect light and blind equipment to the relay outputs and to connect switches and push buttons to the digital inputs. Always use the recommended wires (or wires with larger cross-sectional area).

Show More
action_close

The RP controller expansion modules have PCB mounted connectors for the power input, outputs, and digital inputs. The PCB mounted connectors mate with pluggable connectors:

  • The light modules, blind modules, and the RP-C-EXT-REL-4 relay module have mechanically keyed and color-coded connectors, which allows the matching external connectors to be plugged in on site quickly and easily.

  • The CRS-HH-REL-10 relay module has PCB header connectors for pluggable screw terminal blocks, which are easy to install and remove from the device.

Light Modules, Blind Modules, and RP-C-EXT-REL-4 Relay Module

The pluggable connectors mean time savings and cost reductions for the installation, compared to wiring terminal blocks on site. The connectors can quickly and easily be plugged together on site.

The RP controller expansion modules use 2, 3, 4 or 5 pole connectors for the different inputs and outputs. The 4-pole connector has a 5-pole frame.

The connectors are mechanically keyed, which means the following connections cannot be made:

  • A connector for AC mains and high-voltage applications cannot be plugged into a connector for low-voltage applications.

  • A connector for low-voltage applications cannot be plugged into a connector for AC mains and high-voltage applications.

The matching connectors are locked together.

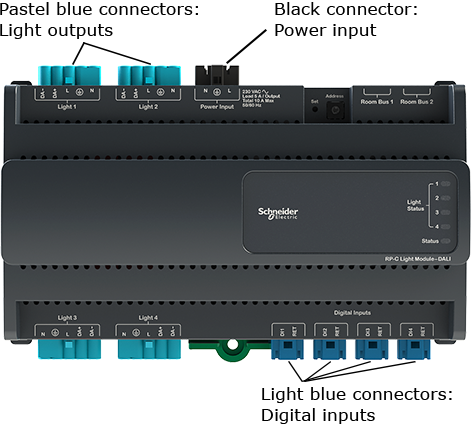
The connectors are also color-coded to help the installers and electricians to choose the correct, matching external connector. The connectors are color-coded:

  • Black: For AC mains power applications such as power supply input, blind high-voltage outputs, SMI (HV) blind outputs, and relay outputs.

  • Pastel blue: For dimming applications such as DALI inputs/outputs and 0-10V light outputs with power distribution.

  • Light blue: For low-voltage applications such as blind low-voltage outputs (24 VDC), 0-10V light outputs without power distribution, SMI LoVo (LV) blind outputs, and digital inputs (5 VDC).

 
action_zoom_plus_stroke Color-coded connectors (example)
Figure: Color-coded connectors (example)

The matching external connectors are not provided but need to be ordered separately from Schneider Electric. For more information, see Required External Connectors for the RP Controller Expansion Modules .

CRS-HH-REL-10 Relay Module

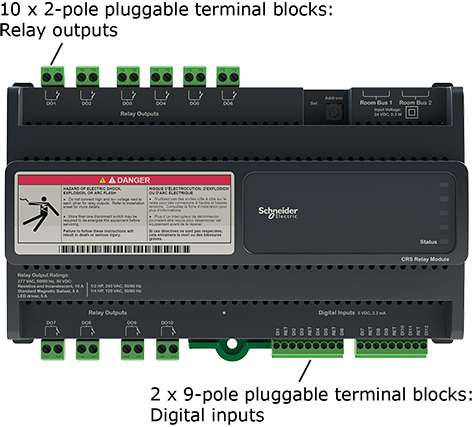
The CRS-HH-REL-10 relay module uses pluggable screw terminal blocks, which are easy to install and remove from the device.

The terminal blocks are delivered in a plastic bag with the device.

The terminal blocks are used as follows:

  • 2-pole terminal blocks (x10) for the relay outputs

  • 9-pole terminal blocks (x2) for the digital inputs

Table: Recommended Screw Tightening Torques

Terminal Block Connector

Recommended Torque

2-pole

0.5 Nm (4.4 lbf.in)

9-pole

0.2 Nm (1.7 lbf.in)

 
action_zoom_plus_stroke Pluggable screw terminal blocks installed on the CRS-HH-REL-10 relay module
Figure: Pluggable screw terminal blocks installed on the CRS-HH-REL-10 relay module

Show More
action_close

The wiring recommendations provide guidance regarding wiring of the Central IO modules, automation servers, BACnet/IP devices, RP controller expansion modules, and Operator Display.

I/O Wiring

The I/O wiring recommendations provide guidance on what type of wires should be used for the different Central IO modules, AS-B server onboard I/O, and BACnet/IP device onboard I/O, how to perform grounding, and how to connect different external devices to the inputs and outputs. This section also provides information on the external connectors required for the RP controller expansion modules. Always use the recommended cables and wires.

For more information, see I/O Wiring .

Communication Port Wiring

The wiring recommendations for the communication ports on the automation servers, BACnet/IP devices, RP controller expansion modules, and Operator Display devices apply to wires and cables used for RS-485 communications, LonWorks communications, USB connections, Ethernet connections, sensor bus connections, room bus connections, and RP controller Modbus network connections. Always use the recommended cables and wires.

For more information, see Communication Port Wiring .

Danger Danger

HAZARD OF ELECTRIC SHOCK, EXPLOSION, OR ARC FLASH

Disconnect the high voltage equipment before wiring.

Failure to follow these instructions will result in death or serious injury.

To wire a screw terminal on CRS-HH-REL-10
  1. Disconnect the high voltage equipment connected to the relay module.

  2. Loosen the screw of the terminal.

  3. Strip approximately 7 mm (0.3 inch) of the insulation from the end of each wire.

  4. Insert the end of the wire fully into its intended terminal. Ensure that no bare wire strands extend from the terminal.

  5. Tighten the screw using a small flat-blade screwdriver. Ensure that the screw is fully tightened. Use the following recommended screw tightening torques:

    • Relay outputs, 2-pole connector: 0.5 Nm (4.4 lbf.in)

    • Digital inputs, 9-pole connector: 0.2 Nm (1.7 lbf.in)

  6. Use appropriate cable strain relief methods, especially for wires that carry 30 VAC or 42.4 VDC or above, to help prevent any load applied to the cable from being transferred to conductor terminations.

    You can use the anchor points on the relay module enclosure and cable ties to fasten and fix the cables.

  • RP Controller Expansion Module Pluggable Connectors
  • RP Controller Expansion Module Device Installation
  • Wiring
  • Powering Up an CRS-HH-REL-10 Relay Module