
How to
Installing an RP Controller Expansion Multi-sensor on a Ceiling Using the Mounting Ring
You install an RP controller expansion multi-sensor on a ceiling using the supplied mounting ring to properly fasten the multi-sensor on the ceiling.
The RP controller expansion multi-sensor can be installed on a dropped (suspended) ceiling, a drywall ceiling, or a junction (gang) box.
Rules and Regulations
The multi-sensor must be professionally installed to comply with the following rules and regulations:
Part 15 of the Federal Communications Commission (FCC) rules
Innovation, Science and Economic Development Canada (ISED) licence-exempt Radio Standards Specifications (RSSs)
2014/53/EU Radio Equipment Directive (RED) of the European Union (EU).
S.I. 2017/1206 - Radio Equipment Regulations 2017 of the United Kingdom (UK)
For more information, see RP Controller Expansion Multi-sensor Regulatory Compliance and Approvals .
General Installation Requirements
The multi-sensor is designed to be installed horizontally in a ceiling. The device can also be installed on a junction box when there is no ceiling and space is opened to plenum.
The multi-sensor must be installed with the passive infrared (PIR) sensor facing down. Installing the multi-sensor on a wall will reduce the coverage range of the PIR sensor.
Installation Using the Mounting Springs
The multi-sensor is typically installed on a dropped ceiling. For that reason, the multi-sensor is delivered with three flexible mounting brackets (springs) preinstalled on the device. The mounting springs enable quick and easy installation of the multi-sensor on a dropped ceiling. The installation requires a clearance hole with a diameter of 75 to 76 mm (2.95 to 3.00 inches) in the ceiling tile.

Multi-sensor installed on a dropped ceiling
The Multi-sensor (RP-C-EXT-MS-BLE) and Insight-Sensor (RP-C-EXT-IS-BLE) are the same size and have the same cabling. This means an already installed Multi-sensor can easily be replaced with an Insight-Sensor, or vice versa.
Installation Using the Mounting Ring
The multi-sensor also comes with a mounting ring, which enables the following alternative installation methods:
Installation on a junction box
Installation on a drywall ceiling
The multi-sensor can be installed on a junction box when there is no ceiling and space is opened to plenum. The installation requires an octagon junction box of size 4.0 inches (102 mm) and a minimum depth of 1.0 inches (25.5 mm).
The octagon junction box is not included.

Multi-sensor installed on an octagon junction box
You can use the two alignment notches on the mounting ring to position the device.
The mounting ring also makes it possible to install the multi-sensor on a drywall ceiling using an appropriate anchoring system. The installation requires a clearance hole with a diameter of 75 to 76 mm (2.95 to 3.00 inches) and two mounting holes that fit number 6, 8, M3, or M4 screws (with or without anchors) in the drywall ceiling. You can use the 1:1 drill template in the installation sheet, which comes with each multi-sensor, to measure out the location of the holes. You can also use the mounting ring to measure out the holes.

Multi-sensor installed on a drywall ceiling
Refer to the dimensional drawing before installing the multi-sensor.
action_zoom_plus_stroke 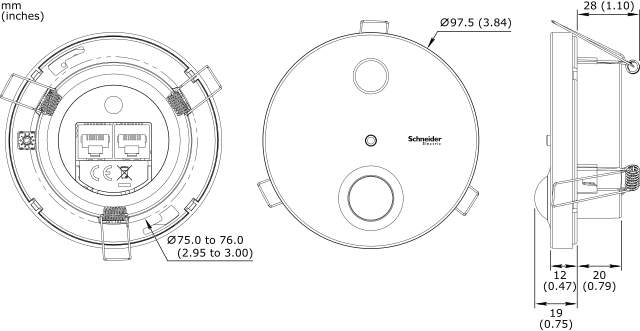
Ensure that you have the proper mounting hardware and anchoring system.
Check the weight-bearing load before choosing your mounting hardware.
Find a suitable location and surface on which to mount the multi-sensor.
Use the 1:1 drill template in the installation sheet, which comes with each multi-sensor, to measure out the location of the following holes:
A clearance hole with a diameter of 75 to 76 mm (2.95 to 3.00 inches)
Two mounting holes that fit number 6, 8, M3, or M4 screws (with or without anchors)
action_zoom_plus_stroke 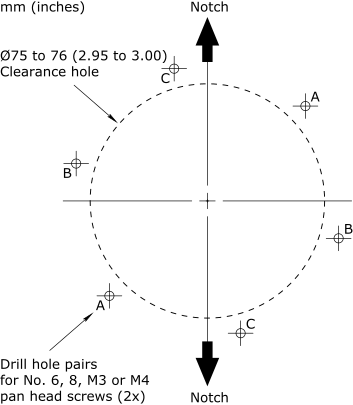
You can also use the mounting ring to measure out the holes.
Create a circular clearance hole with a diameter of 75 to 76 mm (2.95 to 3.00 inches) in the ceiling using a hole saw or other tool.
Drill two mounting holes that fit number 6, 8, M3, or M4 screws (or anchoring system per manufacturing specification).
Install number 6, 8, M3, or M4 pan head screws (with or without anchors) in the two holes, leaving approximately 5 mm (0.2 inch) space between the head of the screw and the ceiling to accommodate the mounting ring material thickness.
action_zoom_plus_stroke 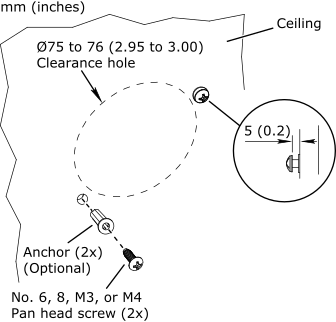
Align the keyholes slots on the mounting ring to the mounting screws installed in the ceiling and then rotate the mounting ring clock-wise until the ring is retained. Tighten the screws to fasten the ring.
action_zoom_plus_stroke 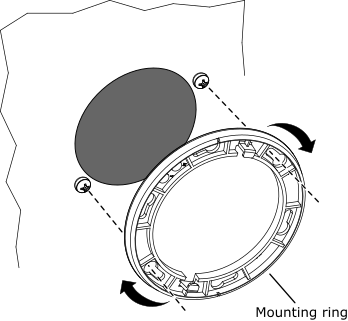
Remove the three mounting springs from the multi-sensor. Push gently against the tab with a tool such as a screw driver and then remove the spring.
action_zoom_plus_stroke 
Connect the room bus cable(s) to the multi-sensor.
For more information, see Connecting RP Controller Expansion Modules and Multi-sensors to RP-C .
Configure the room bus address for the multi-sensor using the rotary switch on the device.
For more information, see Configuring the Room Bus Address for an RP Controller Expansion Sensor Module .Attach the multi-sensor to the mounting ring by inserting the locking tabs on the mounting ring into the keyhole slots on the back of the multi-sensor. Rotate the multi-sensor clock-wise until it locks into place.
Tip:You can use the two alignment notches on the mounting ring to position the device.
action_zoom_plus_stroke 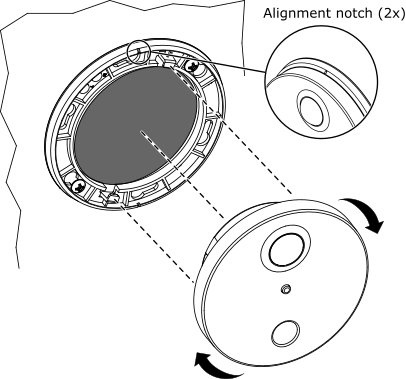
 RP Controller Expansion Multi-sensor Device Installation
Connecting RP Controller Expansion Modules and Multi-sensors to RP-C
Configuring the Room Bus Address for an RP Controller Expansion Sensor Module
Installing an RP Controller Expansion Multi-sensor into a Dropped Ceiling Using the Mounting Springs
Installing an RP Controller Expansion Multi-sensor on an Octagon Junction Box Using the Mounting Ring
RP Controller Expansion Multi-sensor Device Installation
Connecting RP Controller Expansion Modules and Multi-sensors to RP-C
Configuring the Room Bus Address for an RP Controller Expansion Sensor Module
Installing an RP Controller Expansion Multi-sensor into a Dropped Ceiling Using the Mounting Springs
Installing an RP Controller Expansion Multi-sensor on an Octagon Junction Box Using the Mounting Ring