
How to
Creating a Variable Triggered Notification
You create a variable triggered notification to notify users when a variable meets the configured trigger condition.
Notifications are used for notifying users or user groups that a certain alarm or other event, such as a schedule or an application condition, has occurred in the system. The notification contains a prewritten message that can be displayed as a popup message, sent as an email, sent to an SNMP manager, or written to a text file.
There are two types of notifications:
alarm triggered notifications
variable triggered notifications
Alarm triggered notifications are based on alarm filter conditions that have to be met before the notification is triggered.
Variable triggered notifications are based on a variable whose condition (true, false, or both) has to be met before the notification is triggered. You can also trigger notifications manually by using the trigger notification command.
You have to have permissions to the alarm that triggered the notification to receive an alarm triggered notification as a client notification or via email.

A notification is triggered and sends a notification report using one or more distribution methods
When setting up the notification, you configure the message text and the conditions that trigger the notification. When configuring the notification message text, you can use substitution codes to add current system information. For more information, see Alarm Substitution Codes
If you want a schedule condition to be met before the notification is enabled, you can add a schedule to the notification. For example, you only want an email to be sent on weekends. You configure the active value to match the value of a multistate schedule when the notification is to be active. This only applies for alarm triggered notifications.
In a multi-server system, a notification object created on the Enterprise Server notifies on alarms triggered in the SmartStruxure server devices. The advantage of creating the notification object on the Enterprise Server is that you do not need to create separate notification objects for each SmartStruxure server device.
You can configure the notification so that it is localized to any language for which a language pack is available on the server. The default language is US English. If you choose to localize the notification, enumerations and display names are translated with the correlating names available in the language pack.
You can configure the notification to use any of the following decimal separators:
'.' (period)
',' (comma)
By default, the decimal separator is '.' (period).
Alarm Substitution Codes
Alarm substitution codes represent the information you want to dynamically add to alarm messages and notifications when an alarm is triggered.
For more information, see Alarm Substitution Codes .
Notification Distribution Methods
There are four different ways to distribute a notification to a recipient:
Client
Email
SNMP
Write to File
For more information, see Notification Distribution Methods .
Notification Reports
You can configure notification reports to include important information on the Building Operation system. Notification reports are distributed when a notification is triggered.
For more information, see Notification Reports .
Notification Workflow
Use the notification workflow to create a notification including a notification report template.
For more information, see Notification Report Workflow .
Date and Time Formatting
You can customize how date and time are presented in a notification text or a notification report text.
For more information, see Date and Time Formatting .
Text Formatting
You can customize the presentation of decimals, value types, width, and alignment in a notification text or a notification report text.
For more information, see Text Formatting .
In WorkStation, in the System Tree pane, select the folder where you want to add the variable triggered notification.
On the File menu, point to New and then click Notification .
In the object type list, select Variable Triggered Notification .
In the Name box, type a name for the variable triggered notification.
In the Description box, type a description for the variable triggered notification.
Click Next .
In the Trigger variable box, enter the variable that triggers the notification.
action_zoom_plus_stroke 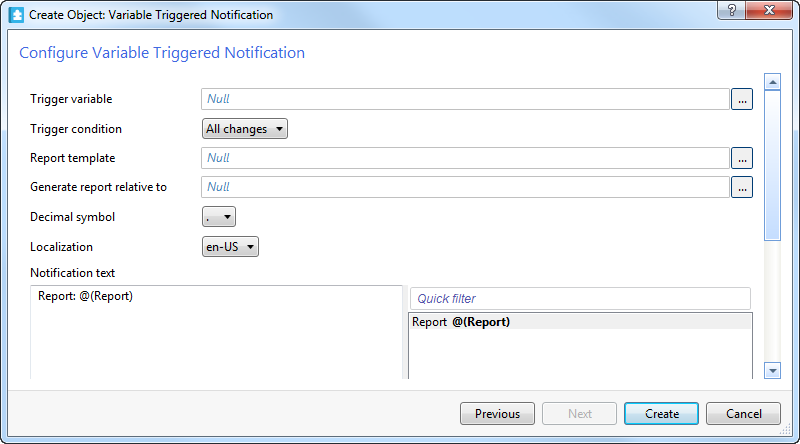
In the Trigger condition box, select when you want the notification to be triggered: when the trigger variable changes to True, changes to False, or on all changes.
To add a notification report to the notification, in the Report template box, enter the path to the notification report template. For more information, see Notification Reports .
In the Generate report relative to box, enter the path to the object that is relative to the generated notification report.
In the Decimal symbol box, select the decimal symbol to be used in the notification and notification report.
To localize the notification, in the Localization box, select a language among the language packs installed on the SmartStruxure server.
In the Notification text box, enter and edit the notification text.
Note:You can use substitution codes, blank spaces, blank rows, and all printable characters in the notification text.
From the list of substitution codes, drag the substitution codes you want to use in the notification text to the Notification text box.
Click the Add button
to add a notification distribution method for the notification.action_zoom_plus_stroke 
action_zoom_plus_stroke 
To add a Client distribution method, select Client and complete the following steps:
In the Name box, type a name for the distribution method.
In the Description box, type a description for the distribution method.
Click Create .
To add an Email distribution method, select Email and complete the following steps:
In the Name box, type a name for the distribution method.
In the Description box, type a description for the distribution method.
Click Next .
In the Subject box, type a subject that is displayed in the 'Subject' row of the email.
In the To users and groups box, enter the Building Operation users or user groups to whom the email notification is to be sent. For more information, see Users and Groups Dialog Box .
In the To email address box, type the email address of an alternative recipient.
Click Create .
To add an SNMP distribution method, select SNMP and complete the following steps:
In the Name box, type a name for the distribution method.
In the Description box, type a description for the distribution method.
In the Address box, type the address to the SNMP manager that receives the notification.
Click Next .
In the Port box, type the port that is used by the SNMP manager that receives the notification.
In the User name box, type the user name of the user on the SNMP manager that receives the notification.
In the Security level box, select the security level.
In the Authentication protocol box, select the authentication level.
In the Authentication password box, enter the password of the user on the SNMP manager that is to receive the notification.
In the Confirm password box, type the password again.
In the Privacy encryption protocol box, enter the privacy encryption protocol of the user on the SNMP manager that is to receive the notification.
In the Privacy password box, enter the privacy password used to encrypt the message being sent.
In the Confirm password box, type the password again.
Click Create .
To add a Write to file distribution method, select Write to file and complete the following steps:
In the Name box, type a name for the distribution method.
In the Description box, type a description for the distribution method.
Click Next .
In the File name box, type a name for the file.
In the Uniqueness box, select whether to append or prepend a timestamp to the file name, or generate the file without any timestamp.
In the Overwrite box, select True to overwrite the file when a new file is generated.
Click Create .
Click Create .
 Notifications
Notification Reports
Notifications
Notification Reports
 Create Notification Wizard - Configure Email Page
Create Notification Wizard - Configure SNMP Page
Create Notification Wizard - Configure Write to File Page
Users and Groups Dialog Box
Configuring a Variable Triggered Notification
Creating an Alarm Triggered Notification
Manually Triggering a Notification
Create Notification Wizard - Configure Email Page
Create Notification Wizard - Configure SNMP Page
Create Notification Wizard - Configure Write to File Page
Users and Groups Dialog Box
Configuring a Variable Triggered Notification
Creating an Alarm Triggered Notification
Manually Triggering a Notification